Alan87
Alan 8001
Cobra 148GTL-DX
Galaxy DX99V Eagle 2000
Mirage 88
Sommerkamp TS-790DX
SuperStar 390FM (New)
SuperStar 3900
Circuit Theory
PLL Circuitry. PLL is an abbreviation of the phase-locked loop which is
fundamentary composed of a closed loop feedback citcuit. The feedback component is the
balance of frequency drift and the PLL circuit acts to cancel it out. To detect out the
frcquency drift of the PLL output, a fixed reference ocillator (10 kHz, 1/1024 divided
down from 10.240 MHz) is compared constantly with the input frequency (10 kHz). The input
frequency is obtained by dividing the VCO frequency. A functionalI block diagram is
provided below under "PLL Circuit" for the easier understanding.
Off-Set frequency oscillator IC10. The off-set-frequency oscillator IC10
oscillates at 14.460 MHz for all band. Switching between these oscillating frequencies is
made by biasing the diodes D34 to D36.
The off-set frequency signal is obtained at IC10 Oscillator and flows into IC10 Mixer
where it is beat with the VCO signal. The VCO signal is obtained from the following:
f vco = foff-set + Nfr
Where, f vco = VCO frequency, N = programming code for divider output, and fr =
referency frequency step (10kHz).
i.e.: At channel #1 in band A, and band corresponding N code is 91:
f vco = 14.010 + 91 x 0.01 = 14.920MHz.
Since the mixer output determined by two factors the off-set frequency output (dependent
on band selector switch) and the VCO output, the mixer output contains the subtracted
frequency of 0.91 to 2.25 MHz. These frequencies appears in pin #2 of IC5, and divided by
the programmable divider in IC5 down to 10 kHz which is compared with another 10kHz signal
obtained from the reference oscillator TR24 (10.240MHz).
The VCO output is mixed with the off-set frequency signal and applied to the TX mixer IC9
through band-pass filters.
i.e. At channel 1 in band A, and AM band, the TX mixer IC9 accepts 14.920 + 10.695MHz =
25.615MHz is TX frequency.
When receiving channe 1 in band A (26.065MHz), the 1st RX mixer TR18 accepts 15.370 local
ignal at its base, and converts down it down to 10.695MHz IF (for AM/FM mode, this is the
1st intermediate frequency). TR18 off-sets the 10.695MHz signal so that TR30 can oscillate
at 10.6975MHz for LSB. 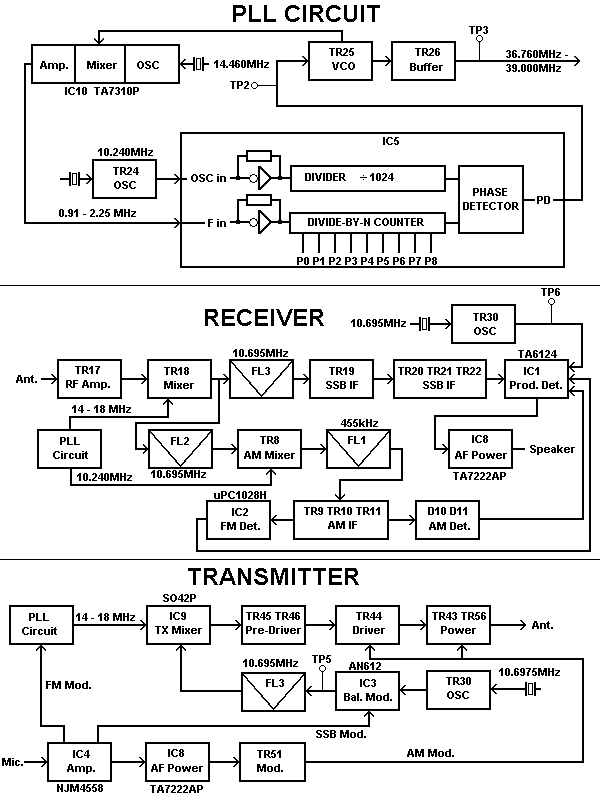
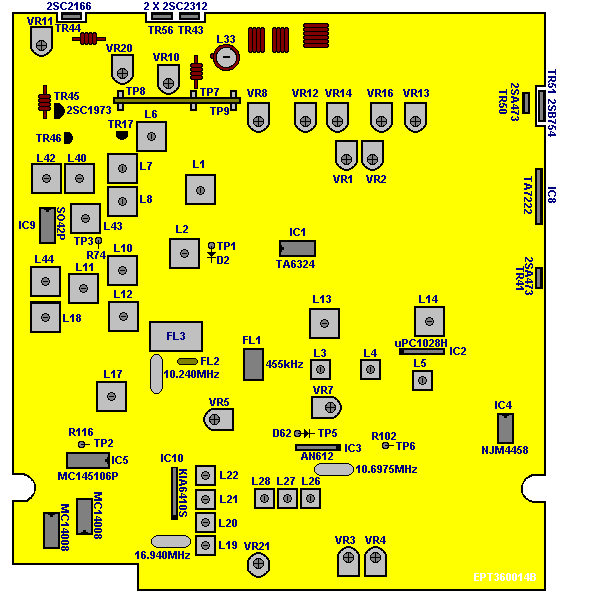
Adjustment
Test equipment required:
|
|
|
|
| Power Supply: 13,8 V |
Frequency Counter |
Dummy Load 50 ohm |
Oscilloscope |
|
DC Amperemeter |
RF SSG |
AF SSG |
Preparation alignment:
|
|
| Clarifier |
Mid. |
| SQ GAIN |
Max. |
| AF GAIN |
Max. |
| RF GAIN |
Max. |
| MIC GAIN |
Max. |
| MOD, S/RF |
S/RF |
| NB/ANL |
Off |
| Band |
D |
| Channel |
19 |
| Reading Point |
Condition |
Adjustment |
Procedure |
| PLL |
|
|
|
| IC5 Pin 3 |
- |
Check |
10.2400MHz |
| TP2 |
Band:D, Ch.:40 |
L17 |
5,0 Volt |
| TP3 |
- |
L18 |
Maximum on Oscilloscope |
| OSCILLATOR |
|
|
|
| IC10 Pin 9 |
AM |
L19 |
16.9400MHz |
| IC10 Pin 9 |
USB |
L20 |
16.9425MHz |
| IC10 Pin 9 |
LSB |
L21 |
16.9375MHz |
| |
|
|
|
| IC10 Pin 9 |
TX AM |
VR21 |
16.9400MHz (TX-Frequency) |
| |
|
|
|
| TP5 |
TX AM |
L26 |
10.6950MHz |
| TP6 |
RX USB |
L27 |
10.6925MHz |
| TP6 |
RX LSB |
L28 |
10.6975MHz |
| |
|
|
|
| TP5 |
TX USB |
VR7 |
SSB Modulator Balance |
| |
|
|
|
| RECEIVER |
|
|
|
| |
RX AM |
L6 L7 L8 |
RF Input |
| |
RX AM |
L10 L11 L12 |
AM/FM/SSB IF |
| |
RX AM |
L3 L4 |
AM/FM IF |
| |
RX FM |
L5 |
Discriminator Coil (FM Demodulator) |
| |
|
|
|
| |
|
|
|
| TP1 |
RX USB |
L1 L2 |
Noise Blanker IF |
| |
|
|
|
| |
RX USB |
VR3 |
SSB Squelch |
| |
RX AM |
VR4 |
AM/FM Squelch |
| AM/FM S- Meter |
RX AM |
VR1 |
|
| SSB S- Meter |
RX SSB |
VR2 |
|
| TRANSMITTER |
|
|
|
| TP9 (+) TP8 (-) |
Bias Driver |
VR11 |
10mA |
| TP9 (+) TP7 (-) |
Bias Finale |
VR10 |
100mA |
| TP9 (+) TP7 (-) |
Bias Finale |
VR20 |
100mA |
| |
TX AM |
L42 |
Maximum |
| |
TX AM |
L43 |
Mixer Coil (VCO-frequency input) |
| |
TX AM |
L44 |
Mixer Coil (TX-carrier 10.695MHz input) |
| |
TX AM |
L40 L42 |
Maximum RF output |
| |
TX AM |
L33 |
Minimum Harmonic |
| |
TX AM |
VR13 |
15 Watt (30 Watt with Dual Finale output) AM/FM |
| |
TX USB |
VR12 |
20 Watt (40 Watt with Dual Finale output) SSB (ALC) |
| |
TX AM |
VR14 |
90% AM-Modulation (AMC) |
| |
TX FM |
VR5 |
2 kHz FM-Deviation |
| |
TX CW |
VR16 |
CW Tone (Not in all model`s) |
| Power Meter |
TX AM |
VR8 |
|
| |
|
|
|
| |
|
|
|
| |
|
|
|
Microphone Connection
| Pin |
Description |
| 1 |
Ground |
| 2 |
Microphone |
| 3 |
TX Key (Connect to Ground) |
| 4 |
Speaker (Connect to Ground) |
Dual Finale output modification
PLL and Frequency band modification
Frequency List for Alan 87
COMPONENTS
MC145106P PLL Frequency Synthesizer
S042P TX Mixer
KIA6410S Oscillator, Mixer and Amplifier
uPC1028H FM IF Amplifier and Detector
AN612 Balanced SSB Modulator
TA7222 Audio Power Amplifier
NJM4558 Dual Operational Amplifier
TA6324 Quad Operational Amplifier
2SC1969 RF Finale Transistor (SuperStar 3900)
2SC2312 RF Finale Transistor (Alan 87)
2SC2166 RF Driver Transistor
2SC2086 RF Pre-Driver Transistor
2SB754 LF Power Transistor
2SA473 LF Power Transistor
Improved receive gain
Quieting of AM reception and improving gain of incoming signals is a common request
from radio operators. In the first stages of the HF input 2SC1674 transistor can be found.
This transistor is responsible for the amplification of a small detected signals. A
problems exist if the transistor itself is noisy as is such the case of the 2SC1674 when
compared to other low noise packages. Along with the amplification of the incoming signals
is transistor noise. Replacement of this transistor with a higher gain, lower noise
transistor greatly improves the signal to noise ratio of your receiver.
We will use an 2SC2999 transistor that has higher gain lower noise characteristic. Replace
the 2SC1674 (TR17) with an 2SC2999 (or similar low noise and high gain
transistor) to achieve this improved signal to noise ratio.
Re-Adjust L6 and L7
The gain will improved with more than 6dB with the same signal to noise ratio.
Modificatie voor Galaxy
99
- Remove the case and find the small circuit board (EOT004410Z) connected to the left side
of the radio as viewed from the component side of the main chassis.
- Find the wire that is connected to this circuit board(in step 1)..Remove this wire.
- Remove the small screw that holds the small board on to the chassis.
- Under this board you will find a 7 pin plug that is not connected to anything. Insert
this plug into the empty socket on the small circuit board.
- Replace screw back into the small board and close case.
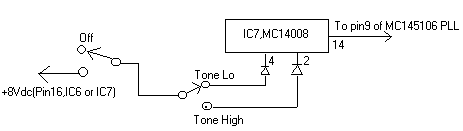
Expanding the Cobra
148GTL-DX/Superstar 360FM(PB010)
Clip off the YELLOW, WHITE, & PINK wires from the ch.9 panel switch. Reconnect
WHITE & PINK together for normal LED channel display. Cut off the GRAY wire from the
HI/LO TONE panel switch. Remove the grounding jumper at pin 9 of the MC145106 PLL chip.
Connect a small bare wire between the center terminals of the now free poles of the CH.9
& TONE switches. Add the two 1N914 diodes and additional switch wiring as shown below
The extra frequencies will now appear in the Ch.12-40 positions of the CHANNEL SELECTOR
with the BAND selector in the HIGH position. (The first 11 channels are repeats of
existing channels.)The "ch9" position activates the expansion. In the LO TONE
position you will get 28.195 Mhz (ch.12) to 28.495(ch.40).if you pull IC7 pins 4 & 2
HIGH at the same time you will get coverage up to 28.705 Mhz. This would need a three
position switch.
29-MHz Channel Conversion for the
SuperStar 3900
Remove "both radio covers and unplug the
speaker from the board. Locate Pin #12 and Pin #13 of IC-7 (Adder Chip MC1408BCP).
It is easier to perform this conversion from the COMPONENT side of the board.
Mount a SPST toggle switch in a convenient
location and wire the toggle to Pins 12 & 13 of the IC-7 chip. Be careful not to
short out any other pins of the IC. Recheck all connections and put covers back on
the radio. You now have 29 MHz coverage.
Super Star 3900: Roger
Beep Modification
The Fix:
Locate jumper J9 on the board located behind the S/RF meter. If you cut
this jumper, it will deactivate the Roger Beep. If you would like a
"switchable" Roger Beep, you simply add a SPST switch across J9.