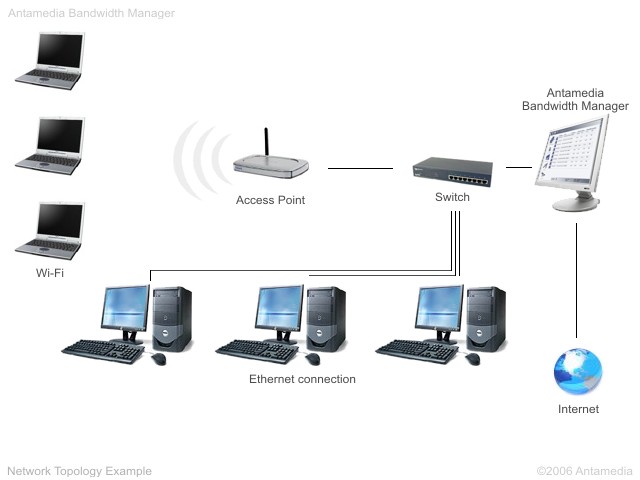
Network Topology 3
Antamedia Bandwidth Manager should be
installed on standard PC computer running Windows OS. We'll call this
computer Server computer.
As a first step, we will share Internet connection on NIC 2. To remind you, this is a network card that connect server computer with Internet. We recommend using Windows Interent Connection Sharing (ICS) as it's easy to setup and it's free to use. Detailed steps are described here: NIC1 (connects your network with HotSpot computer) will get IP address 192.168.0.1. This is default IP that Internet Connection Sharing sets to your network card. Note that you can change this IP address to some other IP address. Subnet mask is 255.255.255.0 . In this network topology, Access point connects wireless laptops through the Switch and the server computer to the Internet. IP address of Access Point is 192.168.0.10. Access Point have DHCP enabled so it assigns IP addresses automatically to all wireless laptop computers. Laptops will get IP address from range 192.168.0.11 to 192.168.0.49 and will have the same subnet mask as your server computer 255.255.255.0. Gateway should be 192.168.0.1 and DNS addresses are usually assigned by your ISP. NAT (Network Address Translation) should be disabled on the Access point. In our example three Wired computers
are connected to the Internet through the Switch and the server
computer. IP addresses of Wired computers are 192.168.0.101 ,
192.168.0.102 and 192.168.0.103. Subnet mask is the same as your server
computer 255.255.255.0. Gateway is 192.168.0.1 and DNS addresses are
usually assigned by your ISP.
Once your customers step in your
Access Point WiFi range, they will be able to scan the network and
discover your Access Point. After they connect, Access Point will
assign them IP and DNS settings automatically using DHCP. Please note
that you need to enable free connection to Access Point without
encryption or other limitations. If you have multiple Access Points you
should specify different IP range that DHCP assigns to wireless users. |
©2001-2007 Antamedia
|
