|
| What is Antamedia HotSpot software ?
|
|
|
Antamedia HotSpot Software is Windows PC gateway software
which enables control and charging for Internet access using captive
portal technology. This software is suitable for all purposes where
customers should get fast login to system without Client software
installations. Upon connecting to network (using wireless cards or UTP
cable), customer will be prompted to type username and password to get
access to Internet. Customer will see their time and bandwidth usage
and will be able to refill their time when needed.
Before you begin, please make sure that you have configured Internet Connection Sharing
on your computer. This is basic sharing method which comes with
Windows. However, you can configure sharing in different way - using
hardware or third party software.
If you need help with network setup, please check our network topology documents.
| Main HotSpot control panel
|
|
|
Main panel shows the most important
details of connected computers: IP and MAC address, username, time
left, quota (bandwidth left for use), bandwidth (data transfer per
second) and inactivity.
In case of unlimited time accounts, time left field will be
represented as 'Unlimited'. If account has unlimited bandwidth, quota
and bandwidth fields will show '...'
Bottom status line shows number of connected computers and total bandwidth used (data transfer per second).
If you prefer smaller computer icons, you can switch to compact
view and display more computers in screen. Option is located in HotSpot
- Setup - Options page.
Inactivity field shows time left in seconds before automatic logoff
occur. Inactivity is optional for every account and default number of
seconds can be specified in HotSpot - Network page. It's suitable to
turn off this option for account if unlimited accounts is going to be
used.
From the main panel you can choose one of the options:
• 'Computers' - Displays computers and their current status (screenshot below)
• 'Accounts' - Configure and generate customer accounts
• 'Statistics' - Shows earnings and action log for certain time period
• 'Setup' - Administrator options used to configure HotSpot Software
• 'Logoff' - Lock HotSpot Software. HotSpot will control traffic even if employee or administrator logoff.

Please specify network interface
which is used to connect local network to this computer. It is assumed
that this computer is configured as gateway and connected to internet.
• 'Network Interface' - Choose network interface which is used to connect computers to your HotSpot
• 'Auto start HotSpot for selected interface' - Use it to automatically start HotSpot when program started
• 'IP address' - Set IP address of your network interface
• 'Maximum users' - Set how many computers can connect your HotSpot
• 'Inactivity logout' - Automatically disconnect customer from HotSpot after specified time of inactivity
• 'Start' - Start HotSpot control
• 'Stop' - Stop HotSpot control
• 'Save' - Save network settings

Working with accounts is very easy.
You can sell your services in advance and your customers are obliged to
come back. You can generate accounts for example, for 30 minutes, 1
hour, 5 hours and sell them to your customers. This time can be used
when customer wants to. If there is some time left on their account, it
can be used some other time when customer comes in your cafe.
When
accounts are used, employee assistance is not needed. Customer will
start session by typing username and password in login fields, and end
his session by typing 'LOGOUT' in address bar in web browser. HotSpot
Software is taking care of time calculations for you.

| How to generate accounts ?
|
|
|
If you intend to generate multiple
accounts at once, please define number of accounts to generate. You
will be able to select 'Print bulk accounts (3x7 on one sheet)' option
which allows you to prepare (generate and print) accounts in advance.
When customer walks in, you can simply sell paper ticket which contains
username, password, time and bandwidth available.
In case that single account should be generated when needed, please
put 1 as number of accounts. Start number field will disappear and you
will be able to make account like a customer name.
These are the steps to generate accounts:
1. Type how many accounts you want to generate in the 'Number Of Accounts' field
2. Choose Pricing Plan
3. Change Bandwidth Quota in MB (download limit for this accounts). Bandwidth quota is specified by pricing plan
4. Change Download and Upload Limit in KB/s (maximum download and upload speed). Bandwidth Limit is specified by pricing plan
5. Set account expiration in days
6. Choose if you want to sell the accounts 'Sell Later' or 'Sell Now'
7. 'Enable Unlimited Access Time' - Check this option if you want to give unlimited time to this customers
8. 'Enable Unlimited Bandwidth' - Use this option to enable unlimited download
9. Determine whether you want to print a receipt by checking 'Print bulk accounts (3x7 on one sheet)' option
10. Press 'Generate code' button
11. Press 'Save' button and accounts will be stored in a database

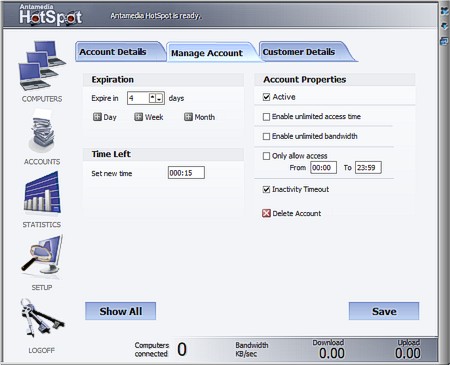
Account details page contains most important account properties and offers time top-up and bandwidth settings.
• 'Username' - Account username
• 'Password' - Account Password. If you want to see account password uncheck Hide checkbox. To change account password, type new password in password field and press Save button
• 'Quota' - Download limit for this account
• 'Download' - Limit download speed
• 'Upload' - Limit upload speed
• 'Daily quota' - Limit download quota per day.
• 'Daily time' - Limit internet access time per day. If user
have left time on the account after daily limit expire, user will be
able to use the account next day.
• 'IP' - IP address of customers computer
• 'MAC' - MAC address of customers computer. This field is filled up upon customer login.
• 'Sell this account' - Use it to sell not sold accounts. Note that unsold accounts can't login to your HotSpot
• 'Add Plan' - Use it to add more time and bandwidth quota to the account
• 'Print receipt' - Determine if you want to print receipt
• 'Stop' - Logout account from the HotSpot
• 'Save' - Save account details

• 'Expiration date' - Set new expiration date to the account
• 'Set new time' - Set new time to the account
• 'Active' - If account is not active, your customer can't login to your HotSpot
• 'Enable Unlimited Access Time' - This option gives you the ability to give unlimited access time to customer
• 'Enable Unlimited Bandwidth' - This option enables unlimited download
• 'Only Allow Access' - If you set this option customer can login with his account only at specified time (set From/To)
• 'Inactivity timeout' - Uncheck this option to disable inactivity timeout for this account
• 'Delete account' - Delete this account from database
• 'Show all' - Show the list of all accounts
• 'Save' - Any change on manage account page require to press Save button
If you intend to offer 1 day access limited to specified hours, you can
set from and to time fields. For example, 'From' 20:00 'To' 08:00 with
expire date set to 1.
Accounts will be logged off automatically in 8:00 (8am).
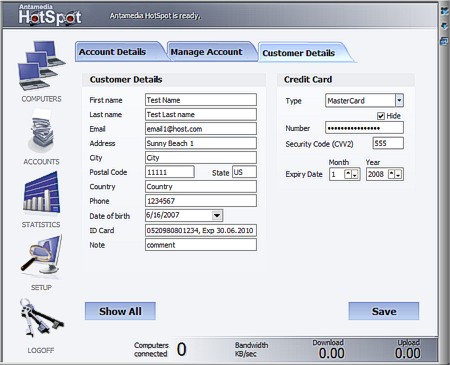
Fill the formular with the customer
details: name, last name, e-mail address, address, city, country,
phone, date of birthday, ID card and credit card info
As soon as customer connects to your
Access Point (or switch, router in case of wired connectivity) and
types any web URL address, login page will be displayed in browser.
Login page contains username and password fields, login button, 'Open
Infobox' option, link for help page, and sign up link if you have a
license with credit card processing option.
To proceed, customer need to type username and password and to press Login button. To logout, customer can type Logout in address bar and press Enter key. To get information about left time and bandwidth quota on the account type Info in address bar.
Login page can be easily customized. You can use integrated page
editor (if you're familiar with html) located in HotSpot - Setup -
Pages - Customize page. If you're satisfied with page layout and just
want to change logo (replace Antamedia HotSpot picture), please go to
HotSpot - Setup - Pages - Quick Change page and choose your own JPG
picture.
If you want to completely change layout of the page, you can use
any of the web page editors (Dreamweaver, Front Page, etc). Please make
sure that login fields, button and other elements stays with the same
name. Otherwise you might experience login problems.

Pricing plans page allows creation of
packages you will offer to your customers. Each plan is defined with
price, time, bandwidth, description and days in which account expires.
If
you have a license with credit card processing option, these plans will
be available to customer for automated order. In sign-up page customer
will see only description of package and it's recommended to put a
highly descriptive plan information.
• 'Currency' - Set the currency used in Your country
• 'Price' - Set the price of the plan
• 'Time' - Set internet access time
• 'Quota (MB)' - Limit bandwidth quota
• 'Download' - Limit download speed in kb/s
• 'Upload' - Limit upload speed in kb/s
• 'Days xpire' - Use thi
• 'Description' - Describe the plan so you can find it easily when generate accounts
• 'Daily time' - Limit internet access time per day.
• 'Daily quota' - Limit bandwidth quota per day.
• 'Add' - Use this button to add pricing plan
• 'Remove' - Use this button to remove selected pricing plan
• 'Currency' - Type the symbol representing your currency
• 'Save' - Save pricing plan list

Examples how to create plans:
- 10$ pricing plan with 5 hours access time, bandwidth quota limited to 1GB and valid for 1 week

- 8$ pricing plan with unlimited access time, bandwidth quota limited to 2GB and valid for 2 days

- 12$ pricing plan with 10 hours access time, unlimited bandwidth quota and valid for 3 days

- 50$ pricing plan with unlimited access time, unlimited bandwidth quota and valid for 1 month

This setup page offers highly
configurable tax system. It's applied to time blocks and bandwidth
quota. You can setup 3 different taxes with desired name (VAT, GST...)
and percent with 3 decimals.
For more complex tax systems you can choose tax on tax options.

Receipt setup allows customization
how the receipt will look like when it is printed out. Receipt contains
time used, price, subtotal, taxes. You can define Receipt Title,
Receipt Header and Receipt Footer.
• 'Choose Receipt Printer' - Choose printer you want to use for receipt printing
• 'POS printer compatibility mode' - Use this option if you have POS receipt printer
• 'Show Logo On Receipt' - Determine if you want printed logo on receipt printer
• 'Choose Logo' - Set your logo. Logo must be in *.BMP format
• 'Show Date And Time' - Set this option if you want printed date and time on receipt
• 'Save' - Save your receipt setup

Credit card processing option is very
important if you want to automate your HotSpot. With this option you
can install unattended HotSpot gateway and our software will do all the
job. Visitors willing to use your services can sign up for username and
password, choose a pricing plan and pay with their credit card.
Processing occurs within seconds and customers are able to continue
using your services.
Antamedia HotSpot offers different credit card processing gateways. Complete list is located here.
Authorize.Net : If you have an account with API, please use API Login ID as Merchant Login and Transaction Key as merchant password.
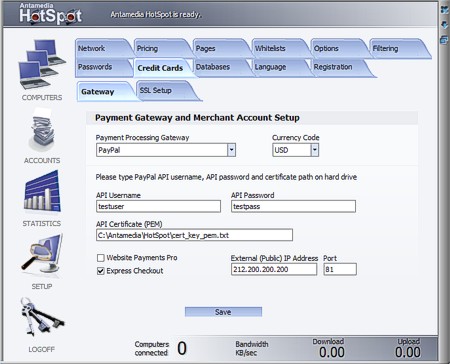
PayPal: There are 2 PayPal processing options:
1. Website Payments Pro - available to US customers only
2. Express Checkout - available in other countries as described hre
Website Payments Pro payment is completed from our software and
there is no need to transfer customer to PayPal site. Processing is
completed faster but this option requires PayPal account with Payments
Pro option enabled which is usually charged monthly by PayPal.
Express Checkout payment is initiated on HotSpot pages and
completed on PayPal site. Customer can use existing PayPal account for
payment which significantly simplifies order, and credit card payment
is available for new customers who doesn't have PayPal account.
In order to use this option, your HotSpot need public IP (or IP of
the network card connected on the Internet side) so you can receive
PayPal payment confirmations. These confirmations activate account and
stores payment details in the database. PayPal Express Checkout receipt
can be customized and it's located in Pages\ReceiptCheckout.htm file.
If you're upgrading from 1.2 to 1.3 version, please delete signup2.htm
page from Pages folder. This page will be recreated to support Express
Checkout.
After setting up, please check Site Whitelist page and make sure that:
api.paypal.com
paypal.com
www.paypal.com
www.paypalobjects.com
paypalssl.doubleclick.net
and HotSpot public IP are listed there.
 PayPal - Website Payments Pro
|
 PayPal - Express Checkout
 |
In both cases, Website Payments Pro or Express Checkout, you'll need to
provide PayPal API username, API password and certificate file. Please
follow these steps to obtain certificate file:
1. Login to merchant account
2. Click on Profile
3. Under Account Information, click on API Access
4. Click on Request API Credentials
5. Select API SSL client-side certificate
6. Select option "I agree to the API Certificate Terms of Use", click on Submit
7. You will get API Username and API Password. Type it in Antamedia HotSpot software
8. On the same page, please click on Download Certificate button
9. Save it in the same folder where software is installed. Make sure that correct path and name is written in certificate path.
To make sure that you have correct certificate file, please open it and verify that it begins with:
-----BEGIN RSA PRIVATE KEY-----
Example of such file follows:
-----BEGIN RSA PRIVATE KEY-----
MIICXQIBAAKBgQDUzQ2GZNhURQrwfM2ccGyXeX7qVondfQE93yN/V3PHs8gxROzK
yUS95WcatQew9of+pPj1QSS9CRJ7xAxn5p/QI9z2kWG8dqraXtZvMwkxlfNb5NYJ
w0jDoQbPLXf1ecowgZqgYPa3rAd7mGgpcywjL5l5Ocnvz6o2cJsvyVuPRQIDAQAB
AoGBAMYTX8V61MoLwhT7dj9pfgq4smPZzVX251L6AoajlkeKlosVxvsywOOpRoFb
hB86OnfSg1F2I4Y5jZTadVm5F4LpFllPJ03vz64vA1HUq1LskE6ucSHwedu1S3vo
5OD93rw9a4LiCOuZ1MtdWxTtGTFIHqhJaIUppn9Tt93Va0pBAkEA85ks76vKIK3z
s4vPqEs1GilGbfvtz1nszHls0MEqKvIjV22gwA871JoQooQG62YtrluCGjbWAC6o
uiKFDhYS+QJBAN+ifpUCYO2PzFysvoNGmFynajLTfmgHMgRntexGnrZB3zyXZ+YU
4CL/cg1W/F2qDNUU53yRSRamVFYP+xc45a0CQFIwfFjhPXGJP5B0u7uspF4PTxQM
zFAJpzvWPECy6+dRi1sUQgiLG0TANpyerzb9YqxRc7QkjE/Dbmpe+0WlbQECQCML
dcaoDsRrilzjfR9ZSrsKSSwZ1G884WurTOjv0CNDg1Yda9y0XMNfQGIyxW1wHn6t
vfDZW5i/C+xIqNJkyikCQQCyRPWwhrL75c1Chkr5GUMy3HURC+VDG9SlM9kavX8p
VyAgIO2MBvZpSEjyxmo0cyKZ66J0wS4T2ukhmn+GbXwU
-----END RSA PRIVATE KEY-----
-----BEGIN CERTIFICATE-----
MIICiTCCAfKgAwIBAgICT04wDQYJKoZIhvcNAQEFBQAwgZ8xCzAJBgNVBAYTAlVT
MRMwEQYDVQQIEwpDYWxpZm9ybmlhMREwDwYDVQQHEwhTYW4gSm9zZTEVMBMGA1UE
ChMMUGF5UGFsLCBJbmMuMRYwFAYDVQQLFA1zYW5kYm94X2NlcnRzMRswGQYDVQQD
FBJzYW5kYm94X2NhbWVyY2hhcGkxHDAaBgkqhkiG9w0BCQEWDXJlQHBheXBhbC5j
b20wHhcNMDYwNjA0MDkwMzM2WhcNMTYwNjAxMDkwMzM2WjBlMSIwIAYDVQQDFBl2
bGFkYW5fYXBpMS5hbnRhbWVkaWEuY29tMRIwEAYDVQQKEwlBbnRhbWVkaWExETAP
BgNVBAcTCEJlbGdyYWRlMQswCQYDVQQIEwJBSzELMAkGA1UEBhMCVVMwgZ8wDQYJ
KoZIhvcNAQEBBQADgY0AMIGJAoGBANTNDYZk2FRFCvB8zZxwbJd5fupWid19AT3f
I39Xc8ezyDFE7MrJRL3lZxq1B7D2h/6k+PVBJL0JEnvEDGfmn9Aj3PaRYbx2qtpe
1m8zCTGV81vk1gnDSMOhBs8td/V5yjCBmqBg9resB3uYaClzLCMvmXk5ye/PqjZw
my/JW49FAgMBAAGjDTALMAkGA1UdEwQCMAAwDQYJKoZIhvcNAQEFBQADgYEAW16b
Sanio2VDdNLlRfu3oXGLU8mZ7kYA8AAPsNmvYdXWEkBmDKCCnnVCLxZzQFyONHR1
WVF78KvBmqYwRu5sYVOyer+0/ytHMLGCJTLBIxKH0hdgCcTkThjwy1UvGGIJ7ZFE
DJ0ApKu9IfkKQvkZXOLY130cFRW4i1eEvLzmMq8=
-----END CERTIFICATE--- --
SSL Certificate is used to encrypt
communication between Antamedia HotSpot and customer browser when user
pay for the account with the credit card. In the HotSpot software -
Setup - Credit Cards - SSL Setup page set the location of Certificate File, Private Key File and CAcert Root Certificate.
Please note that default certificate file can be used. If you want to
create Your own certificate file, please follow instructions from www.antamedia.com/manuals/hotspot/ssl-setup.htm
Certificate file can be ordered from our partner Marc Smith. For more details please visit http://www.hotspotssl.net/

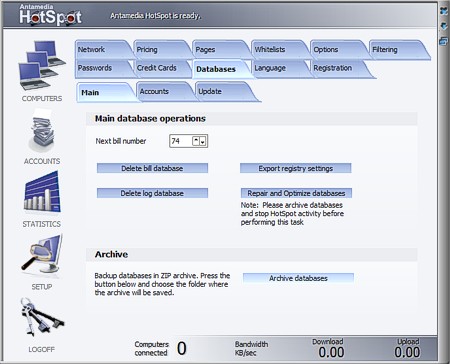
• 'Next Bill Number' - Set next bill number in statistic
• 'Delete Bill Database' - This option will erase complete bill database
• 'Delete LOG Database' - Log Database is used to store various
actions. By time, it gets very large. It's recommended that you backup
databases and delete Log Database periodically
• 'Export Registry Settings' - Use this option to export Antamedia HotSpot software settings in registry file
• 'Archive databases' - in ZIP format. Choose location on your hard drive where it should be stored
• 'Print accounts' with time left on the account and current status
• 'Export accounts' in CSV file (Comma separated values file, Microsoft Excel compatible)
• 'Import accounts' from CSV file
• 'Delete all accounts' - This option will erase complete account database
• 'Delete duplicate accounts' - Delete all duplicated accounts from the database
• 'Delete accounts' with following conditions: Exp Before
(specified date), Last Used Before (specified date), Time Left Less
Than (specified left time on the account), Inactive and Unsold accounts

- To define the same Internet connection speed to all accounts check options download and upload and set the speed in kb/s. Use Update all clients button.
-To define the same expiration date to all accounts set Expire in ... days and use Update all accounts button.

Statistics provide access to
accounting and reporting. You can see a list of bills with date and
time of charge, account username, subtotal tax and total amount charged.
You can easily filter bills and get report for specified time period. Options available on this page are:
• 'Calculate' - Show and calculate bills for specified time period
• 'Export' - Export your report in *.csv, *.txt, *.html or *.pdf format
• 'Print' - Print report

All actions of the employees are
logged and this can be used for detail analysis. Every Start and Stop
of the session, employee login and Logoff, every sell is stored in
central database log file. Of course, there is filter engine for faster
search. You are able to filter database by date, action, computer IP or
MAC address and username.
• 'Show' - Show action LOG database
• 'Export' - Export action LOG database in *.csv, *.txt, *.html or *.pdf format
• 'Print' - Print Action LOG database

There are two kind of passwords used
to access Antamedia HotSpot software. Administrator has a unique
password which allows access to all software options and to setup page.
Employee accounts comes with limited privileges: access to HotSpot
Setup pages is disabled.
How to create employee account:
1. Type name and password of your employee
2. Press Add button to store new employee in database
3. Repeat steps (1) and (2) if you need to create more accounts
4. Press Save button
Use Remove button to delete selected employee account
To set Administrator password:
1. Type password
2. Press 'Save' button

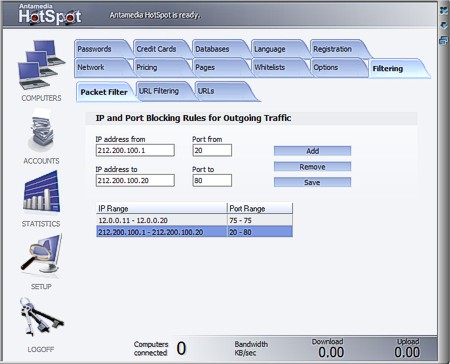
Packet filter option can be used to
block specified IP addresses and Ports for outgoing traffic. You can
block specified port for range of addresses or range of ports for
specified address.
• 'Add' - Use it to add specified IP addresses and Ports in the block list
• 'Remove' - Remove selected IP address or Port from block list
• 'Save' - Save block list
| URL filtering and URL tracking
|
|
|
Antamedia HotSpot software have
ability to track and block unwanted web sites. Web sites will be
automatically blocked if specified keywords appear in url address. This
way you can prevent access to porn, warez and other web sites that do
not comply with your usage terms.
If you enable URL Tracking option, every visited web site
address will be stored in text (*.txt) file, along with details wether
the site was allowed or blocked. Log contains customer username, time
and date, so this option can be used to analyze which web sites your
customers visit and for latest antiterorism reports.
Example: by default of HotSpot software specified
keywords are: sex, erotic, nude and porn. Each web site which include
any of this keywords is automatically blocked: www.eroticsite.com,
www.sexsite.com etc...

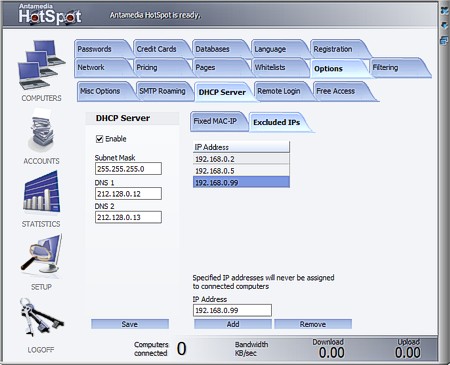
DHCP server option assigns IP
addresses to the client computers instead of your access point. Please
configure Subnet Mask and DNS addresses.
DHCP can be used to provide
fixed IP addresses to specific MAC addresses. For example when specific
computer requires always the same IP .

Excluded IPs can be used to disable
assigning of specific IPs. For example if you want to reserve IPs in
range 192.168.0.2 - 192.168.0.10 for computer in your cafe which are
used by Internet Caffe software
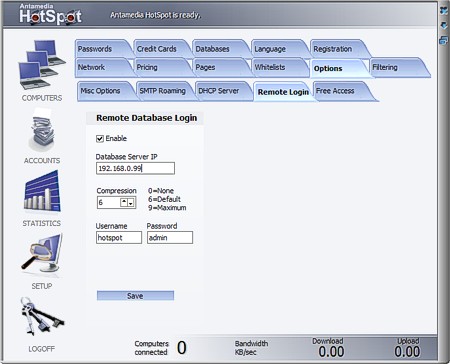
Remote database login allow multiple
HotSpots to connect to one database server and share all accounts.
Database server should be located outside local network (which is
controlled). Please create these folder c:\Antamedia\HotSpot and unpack
database inside. You will find there DBAdmin tool and DBSrvr which is
of course database server. Download database server from http://www.antamedia.com/download/DB.zip
• Enable remote database login option
• Configure IP address of Your database server
• Configure compression of database. Database compression depend
of Internet connection. In the case of slower internet connection
configure higher compression.
• Set database server username and passwords.
Preconfigured account is: user: hotspot, pass:
admin
• Save remote database login setup configuration
Database server allows 5 HotSpots to connect.
Some of ISPs (Internet service
providers) do not allow sending e-mails through other ISPs. SMTP
roaming option can be used to fix this problem. HotSpot software tracks
port 25 which is used for e-mail sending. All traffic from this port
will be routed through SMTP server which you define. This way, customer
will not need to change any SMTP settings in e-mail client (Outlook,
The Bat ...).
To activate SMTP roaming, please
check 'Enable' and type address of your SMTP mail server. This server
have to be outside of local network which is controlled by Antamedia
HotSpot. If you don't know IP, please resolve it by typing SMTP URL,
choose IP and press Save button.

• 'Display small laptop icons' - Change the size of laptop icons in the list of connected users (main page)
• 'Enable multiple logins with one account' - With this option enabled the same account can be used on few computers at the same time
• 'Verify MAC address and enable login only if it's done from the same computer' - Limit login always from the same computers. Computers are recognized by MAC address
• 'Force clearing account IP addresses on HotSpot restart' - Clear all account IP addresses on HotSpot software restart
• 'Increase daily limits (quota and time) to default values when saving account modifications' - Reset daily limits to the defaults when make any modifications to the account

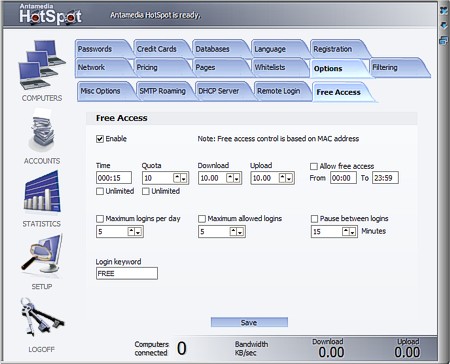
With Free access option allow access to the
Internet without chanrge using specified login keyword. Free access option
is based on MAC addresses so you can limit access:
• 'Time' - Limit internet access time
• 'Quota' - Limit Bandwidth quota
• 'Download' - Limit download speed
• 'Upload' - Limit upload speed
• 'Allow free access' - Allow free access only at specified daytime
• 'Maximum logins per day' - Limit number of logins per day from the same computer
• 'Maximum allowed logins' - Limit allowed free access logins from the same computer
• 'Login keyword' - Set the keyword used for free access login
Antamedia HotSpot software gives you
ability to customize: Login, Logout, Welcome, Max users, Restricted,
Infobox, Infobox Logout, Info and Help pages. All of this pages are in
HTML code format.
If you prefer to edit pages using Web page editing
software (Dreamweaver, Front Page, etc) you can open these pages from
c:\Antamedia\HotSpot\Pages folder.

Custom login option enables different login pages for different computer. Example: If your customer login to your HotSpot from 192.168.0.11 IP address, in customers web browser will be loaded customlogin.htm page. If customer login to your HotSpot from 192.168.0.12 IP address, in web browser will be loaded customlogin2.htm page
• 'Add' - Add IP or MAC address and login page tob the list
• 'Remove' - Remove selected IP address from the list
• 'Choose' - Choose login page from hard disk

Change logo displayed on default
HotSpot pages. Existing logo stored in default location c:\Program
Files\HotSpot\www\HotSpot.jpg will be replaced with your new logo.

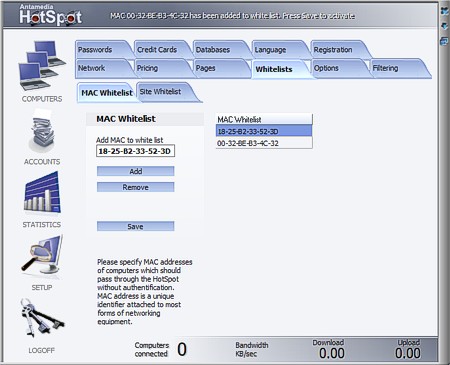
Antamedia HotSpot software gives you
ability to specify MAC addresses of computers which should pass through
the hotspot without authentification. MAC address is a unique
identifier attached to most forms of networking equipment.
• 'Add' - Add MAC to the whitelist
• 'Remove' - Remove selected MAC address from the whitelist
• 'Save' - Save you MAC whitelist
This option gives you ability to
specify web sites which can be accessed by customers without
authentification. Option can be used for advertising purposes.
You can type host names only and IP addresses will be filled automatically after pressing on Add button.
• 'Add' - Add web address to the web site whitelist
• 'Remove' - Remove selected web site from the whitelist
• 'Save' - Save your web site whitelist

If you have any question which is not explained in Manual, feel free to contact us!
To download latest versions of our software please go to download section.
|